Piezography PiezoFlow Continuous Inking System (CIS) installation, use and maintenance instructions
Summary
Instructions are provided for installing, using and maintaining new PiezoFlow systems and replacement PiezoFlow cartridges. This documentation applies to PiezoFlow systems on the following printer models: Epson Stylus 860, 1160, 1200, 1270, 2000P, 1280 and 1290. Instructions for using Niagara Continuous Inking Systems are supplied with the product.
Background on PiezoFlow units
A PiezoFlow system (also known as a “Continuing Inking System” or “CIS”) consists of two cartridges connected to ink bottles, by tubes. The system arrives to you assembled but unfilled, along with a vacuum pump and a bag of foam pads and spare parts. You will fill the PiezoFlow with ink using the following steps, repeated for each channel (or “color”) in the printer:
1. Pull the air out of the ink cartridge, using the vacuum pump connected to the ink tube;
2. Close off the tube with a pinch valve, and then remove the vacuum pump from the tube;
3. Place the end of the tube into the ink bottle, and then open the pinch valve, causing ink to rush into the cartridge and ink tube.
Once full of ink, PiezoFlow cartridges will stay full, as long as there is ink in the bottles to supply it.
Certain printer models use cartridges with ink level monitoring chips (printer models 1270, 1280, 1290, 2000P). The chips on PiezoFlow cartridges have been modified so that once the ink reaches a certain low level (around 10-20% remaining ink), the chip will reset to read “full” after you cycle the printer off and back on. Normal, non-CIS cartridge chips stop working when they read empty.
On printers that use non-chipped cartridges (860, 1160 and 1200), you must reset the ink level monitor manually. This is an easy process; described below.
Contents
This document is broken into different sections, each covering one aspect of the installation and long-term use of your PiezoFlow unit.
Section I: Preliminary Steps (Familiarize yourself with the PiezoFlow, prepare it for filling with ink, and test your printer to ensure it is ready to fill).
Section II: Installing a new PiezoFlow system (How to fill and install your PiezoFlow system).
Section III: Replacing PiezoTone cartridges on a previously installed PiezoFlow system (in certain instances, you may need to replace one or both PiezoFlow cartridges. This section describes how to fill a new cartridge or cartridges to a pre-existing PiezoFlow).
Section IV: Using and maintaining a PiezoFlow system (Tips for best results)
Section V: Troubleshooting problems with a PiezoFlow system (this section describes several issues that may arise
Printer preparation
Test your printer with Epson brand inks before installing third party (non-Epson) inks in your printer, whether it is a new or old printer. Print and carefully examine nozzle check patterns and images. Look for, and fix any missing nozzles or banding problems before proceeding. Unless your printer works perfectly with Epson inks, it will not work perfectly with non-Epson inks.
Safe removal of prefilled cartridges
Printer models 1270, 1280, 1290 and 2000P: if you want to save a cartridge that you remove from one of these printers for use in the future (flush cartridges, Epson ink cartridges, prefilled PiezoTone or NK6 cartridges, etc.), you must first turn off the printer before pulling out the cartridges. If you remove a cartridge from one of these printers when the printer is turned on, the printer will write an “empty cartridge” message to the cartridge’s microchip, making that cartridge unusable in the future. If you wish to discard a prefilled cartridge you remove, you may leave the printer turned on.
1. Push the “ink change” button on your printer.
2. After the print head moves to the ink change position, unplug the power cord from the printer.
3. Remove your cartridge(s), and install the new one.
4. Plug the printer back in, and make sure the print head returns to the right side.
Printer models 860, 1160, 1200 don’t use chips on their cartridges, and you may simply remove the cartridges with the printer turned on, whether or not you plan to reuse them in the future:
1. Push the “ink change” button on your printer.
2. after the print head moves to the ink change position, remove the cartridge and install the new cartridge.
3. Push the “ink change” button a second time, to return the print head to the “parked” position.
Storage of Used Cartridges
If you wish to store a removed prefilled cartridge, put plastic tape over the ink outlet holes on the bottoms of the cartridges, place them in plastic bags, and seal the bags.
Use of flush cartridges: the use of flush cartridges is required when installing PiezoTone inks in your printer and optional when installing Neutral K6 inks.
1. After testing the printer with Epson inks, remove the ink cartridges and replace them with flush cartridges.
2. Print two copies of the “flush image” on copier paper (available either on your CD of ICC profiles, or from here), to remove the remaining ink from your printer. As the flush fluid displaces the ink in your print head the flush image will become lighter as it prints. Even if you still see a slight color tint to the flush image, this is acceptable.
Section II: Installing a new PiezoFlow system

1. Prepare PiezoFlow unit for filling: Remove the PiezoFlow unit from its box and lay it on a table as shown above, in Picture #1. The PiezoFlow unit consists of a set of ink tubes, connected on one end to two ink cartridges, and on the other end to bottle caps. A plastic support arm holds the tubes near the bottle caps. Before proceeding, it is helpful to measure the length of the tubes below the bottle caps, and make sure that 3.5” of tubing (about 9cm) is protruding below the caps. If the length is more or less than this, it is easy to change by sliding the tubes, and the black o-rings on the underside of the bottle caps.
2. Determine the order of the inks in your cartridges: Refer to the table below that is appropriate to your printer model, ink set (PiezoTone or Piezography Neutral K6) and printing system (Piezography BW ICC, Piezography BW plug-in, or QuadToneRIP).
Printer models: 1200, 1270, 1280, 1290 and 2000P
Ink set: PiezoTone inks (Warm Neutral, Cool Neutral, Carbon Sepia, Selenium Tone)
Printing Software: Piezography BW ICC system:
|
PiezoFlow bottle cap says… |
Ink Shade to put into this tube |
|
Black |
Black |
|
Cyanine (Cyan) |
Dark Gray |
|
Photo Cyanine (Photo, or Light Cyan) |
Medium Gray |
|
Magenta |
Medium Gray |
|
Photo Magenta (or Light Magenta) |
Light Gray |
|
Yellow |
Light Gray |
Table 2
Printer models: 1280 and 1290
Ink set: Piezography Neutral K6
Printing Software: QuadToneRIP
|
PiezoFlow bottle cap says… |
Ink Shade to put into this tube |
|
Black |
Shade #1 |
|
Cyanine (Cyan) |
Shade #2 |
|
Photo Cyanine (Photo, or Light Cyan) |
Shade #3 |
|
Magenta |
Shade #4 |
|
Photo Magenta (or Light Magenta) |
Shade #5 |
|
Yellow |
Shade #6 |
Table 3
Printer models: 860 and 1160
Ink set: PiezoTone inks (Warm Neutral, Cool Neutral, Carbon Sepia, Selenium Tone)
Printing software: Either Piezography BW ICC or Piezography BW plug-in
|
PiezoFlow bottle cap says… |
Ink Shade to put into this tube |
|
Black |
Black |
|
Cyanine (Cyan) |
Dark Gray |
|
Magenta |
Medium Gray |
|
Yellow |
Light Gray |
Table 4
Printer models: 1200, 1270, 1280, 1290 and 2000P
Ink set: PiezoTone inks (Warm Neutral, Cool Neutral, Carbon Sepia, Selenium Tone)
Printing Software: Piezography BW plug-in
|
PiezoFlow bottle cap says… |
Ink Shade to put into this tube |
|
Black |
Black |
|
Cyanine (Cyan) |
Dark Gray |
|
Photo Cyanine (Photo, or Light Cyan) |
Dark Gray |
|
Magenta |
Medium Gray |
|
Photo Magenta (or Light Magenta) |
Medium Gray |
|
Yellow |
Light Gray |
3. Unpack the vacuum pump: The vacuum pump, shown in Picture #2 below, is a large syringe with two valves on the end. A T-fitting is connected to the end of the syringe. Each of the two ends of the T-fitting contains a one-way flow valve. The straight through valve lets air in when the syringe plunger is pulled out, and side valve lets air out when the syringe plunger is pushed in.
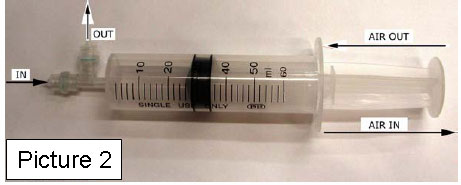
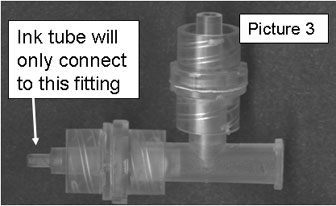
Picture #3 shows the detail of the syringe T-fitting and valves. When the valve is assembled properly the ink tubes can only be connected to the straight-through portion of the T.
4. Test the vacuum pump and the PiezoFlow unit for leaks before filling the cartridges with ink. Test your vacuum pump before use, especially a pump that you have used previously.
a. Test the pump. Sometimes the one-way valves in the syringes may stop working, especially if the vacuum pump has been used previously, and ink or water has gotten into the valves. If a pump has stopped working, it will give the false impression that you’re creating a very good vacuum in the ink tube, when in reality it’s creating a good vacuum only in the syringe, and no vacuum in the ink tube or cartridge. To test the vacuum pump before using it, open and close the syringe plunger a few times, to make sure that the plunger moves freely. Next, place a finger over the straight portion of the T-valve on the end of the syringe. Pull the syringe plunger in and make sure that you feel suction on this end. Then push the plunger in and make sure you do not feel air come out of this end. Next, put your finger over the side portion to make sure that you feel air blowing out when pushing the syringe plunger, but you don’t feel suction through this opening when pulling on the syringe plunger. If the syringe does not operate properly, please contact tech support at [email protected].
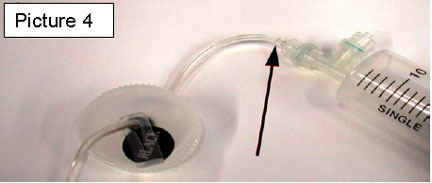
b. Test the PiezoFlow unit. After you verify that the vacuum pump works properly, test the PiezoFlow unit for air leaks. Slide the black position ink tube onto the end of the vacuum pump (picture #4). Pump the syringe plunger 3 times to remove air from the tube and the black cartridge. You should feel increasing resistance with each successive pump. After the third pump, wait 30 seconds, and then try pulling the syringe plunger out one more time. The resistance you feel on the fourth pump should be about the same as it was on the third pump. If the syringe plunger pulls out easily after waiting for 30 seconds, you may have a leak that must be fixed before attempting to fill the cartridges with ink. If you still feel resistance after waiting 30 seconds, the black ink tube and cartridge are in good condition. Test the remaining channels before putting any ink into the cartridges, and make sure that each of the four or six tubes and cartridges do not leak. If you find a leak, check for obvious causes, such as a loose fitting tube on the end of the syringe, or a tube that is loosely connected to a cartridge. Also, check the underside of the cartridge to make sure the foil seals are intact. If you have questions, please contact tech support at [email protected].
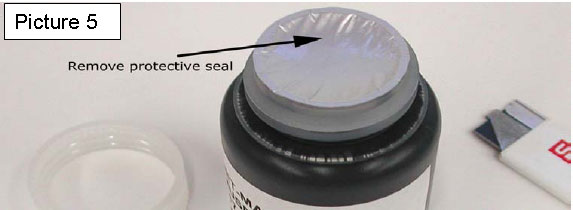
4) Fill the PiezoFlow system with ink. After you have determined the vacuum pump works properly and that the PiezoFlow system does not leak, you may fill the PiezoFlow System with ink. Remove the caps from your ink bottles and completely remove the protective foil seals from the ink bottles (picture 5). Place the bottles nearby, but where they will not get knocked over.
a. It is VERY important to fill each cartridge channel with the correct ink dilution. Make sure to check the ink position label on the PiezoFlow unit and the label on each ink bottle before filling the tube and cartridge chamber with ink. Caution pays off considerably in this step. If you fill a cartridge in the incorrect order, you must replace it; you cannot “fix” an incorrectly filled cartridge, and you cannot retrieve the ink from the cartridge to reuse it.
Start with the Black position ink tube- connect the free end of the black position tube to the vacuum pump (picture #4, above). Pull and push on the syringe plunger 3 times to create a vacuum in the cartridge and tube. Do not pump more than three times, as too strong a vacuum can damage the cartridge. As you perform the next steps, do so as quickly as possible. The cartridges do not hold a “perfect” vacuum, and air will slowly leak back into the cartridge. To get a good ink fill, you want to go as quickly as possible from creating a vacuum in the cartridge to filling the cartridge with ink.
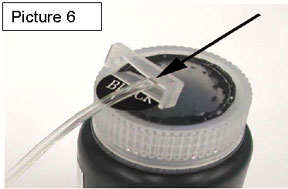
b. As soon as you have created a vacuum in the tube, seal the tube by sliding the plastic “pinch clamp” over the tube. The pinch clamp is located just above the bottle cap (Picture 6).
c. Disconnect the syringe from the tube. Insert the end of the tube into the correct ink bottle, screw the bottle cap onto the ink bottle (Picture #6). Once the lid is in place, open the pinch clamp. You will see the ink rush into the tube and cartridge chamber. Picture #7 shows the black ink tube filled with ink.
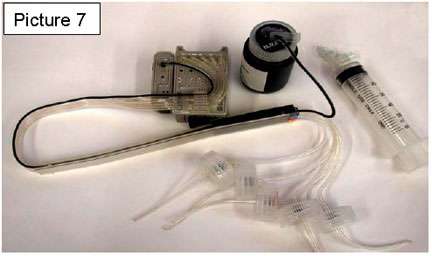
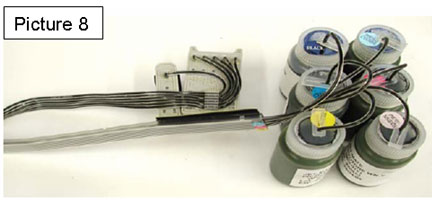
d) Follow steps b. and c. with the other ink position tubes, until all tubes are filled with ink (Picture #8).
5. Install the PiezoFlow unit in the printer:
a. Move the print head to ink change position (left side of printer). With the 1280 and similar printers, push the yellow ink change button. With all other desktop printers, push the paper feed button for about 4 seconds, until the print head moves over to the left side.
b. Remove the flush cartridges from the print head (unplugging the printer if necessary).
c. Remove the lids that hold the cartridges in the print head. These lids are not used with the PiezoFlow cartridges (see pictures below).
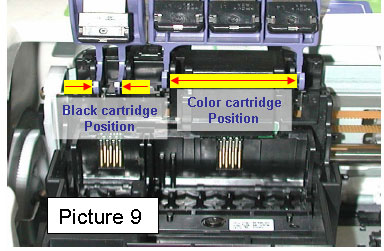
· For Epson 1270, 1280, 1290, and 2000p printers: To remove the black cartridge lid, push the two tabs together. To remove the color cartridge lid, pull the two tabs away from each other (picture #9).
· For Epson 860, 1160, 1200 printers: There are two steps to removing this style lid. First, push the tabs on both the black and color positions away from each other (picture #10).
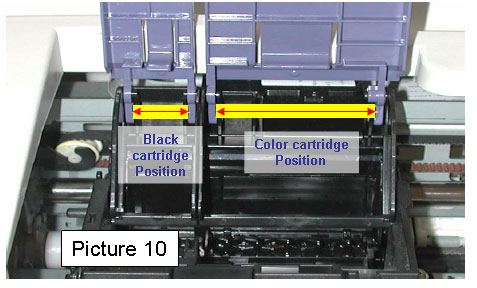
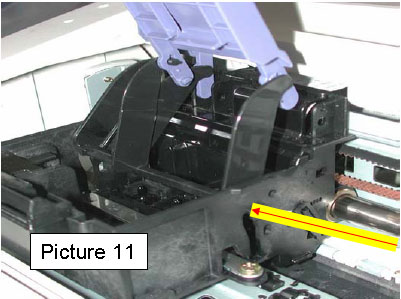
· Second, Line up the square shaped plastic tab with the hole on each side of the print head and remove the cartridge lids from the print head (Picture #11).
You must save these cartridge lids for future use. Store them in a safe place.
d) Push the PiezoFlow carts gently but firmly into the print head (picture #12). The foam pads on the sides of the cartridges hold them in place.
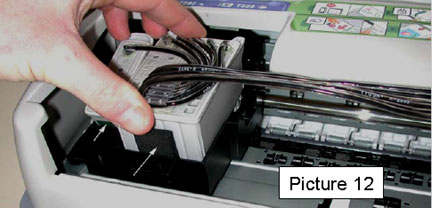
Make sure the PiezoFlow carts are completely seated in the print head. On 1270, 1280, 1290, and 2000p printers, the cartridges will not be recognized if they are not fully inserted. You may have to push down hard in order to get the carts all the way into the print head. Place two or three fingers of both hands under the black plastic cartridge holder while you push the carts down with your thumbs. Push down on both the front and back of the carts to seat the cartridges properly.
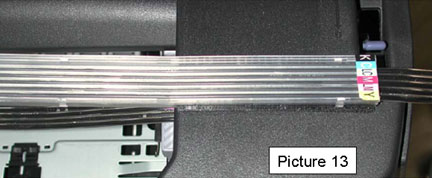
e) Attach the plastic tube support arm to the printer: While the print head is still in the ink change position, and the printer cover flipped up or removed, move the plastic arm until you find a position where the tubes run straight across the printer carriage from left to right. Also, position the arm so that there is a small amount of slack in the tube (1/4 to 1/2 inch, or 5-10mm). If you have more slack than this, the print head will run over the tubes; if you have too little slack and the tubes will pull on the cartridge when the print head moves to the left side of the carriage during printing. Once you have determined a good position for the plastic arm, peel off the paper strip on the Velcro tape, and attach the plastic arm to the printer housing as shown in picture #13. For proper operation, also make sure that the left side of the plastic arm is higher than the right side.
You can make small adjustments of the placement of the plastic arm, by peeling the arm off the Velcro attached to the printer, repositioning it, and then sticking it back on the Velcro.
f) For unchipped cartridge model printers (1160, 860, 1200) you must insert foam blocks into the slots in the front of each cartridge holder. The foam blocks take the place of the lids to signal to the printer that cartridges are inserted. You will find these foam blocks in the small plastic bag that came with your PiezoFlow unit. Refer to the picture below for block placement.
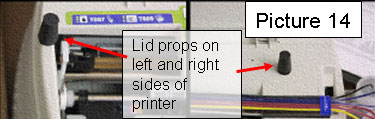
g. Use of Lid Props: You may either leave the printer lid attached, or you may remove it while using the PiezoFlow unit. If you plan to keep the printer lid in place, you must attach the two “lid props” that are located in the plastic bag with the other foam parts. The lid props are cylindrical pieces of foam, with peel-off adhesive on one end. Raise the printer lid, and attach the two props on the horizontal portions on the left and right edges of the printer. Make sure that the props are placed so that the printer lid does not touch any part of the PiezoFlow unit. You may reposition the props if needed, by carefully removing them from the printer. See picture 14.
If you wish to leave the printer lid off the printer, the lid props are not needed. It is acceptable to leave the printer lid off the printer in most environments. If you are printing in a dusty room, it is better to leave the lid in place.
h. Ink bottle placement: The bottles sit to the right of the printer, on the same surface as the printer, not raised nor lowered relative to it. Arrange the bottles so that the tubes are not tangled or pulling on the bottles. Use the cardboard box that came with the PiezoFlow unit to store the bottles, or purchase an acrylic bottle holder from www.inkjetmall.com to organize the bottles and prevent them from tipping over.
i. Return the print head to the “parked position.” Print the “flush image” two more times on typing paper, print a nozzle check pattern, and once you have a perfect nozzle check pattern you are ready to print.
Section III: Replacing ink cartridges on a PREVIOUSLY INSTALLED PiezoFlow System:
This section describes how to replace the ink cartridges in your PiezoFlow unit. Common reasons for needing to replace the cartridges are listed below:
· Converting from the plug-in system to the ICC BW system on 6-color printers requires you to replace the color position cartridge.
· Changing from one ink tone to another requires the replacement of a color position cartridge.
· Changing from PiezoTone inks to NK6, or vice versa, requires the replacement of both cartridges.
· Changing from one black ink type to another requires the replacement of the black position cartridge.
· At other times it may also be necessary to replace one or both cartridges. While the PiezoFlow cartridges can last a long time, they may occasionally need replacement. You may find that your printing degrades after about 2 years of use. This could be due to the degraded sponges inside the cartridges or old ink inside the cartridges (more on this in section IV),
It is not possible to re-use of cartridges when changing inks. The cartridges contain sponges and will always retain some of the old ink.
The instructions below describe how to replace both the black and color position cartridges. IF YOU REPLACE ONLY ONE CARTRIDGE YOU WILL NEED TO REMOVE THE OTHER CARTRIDGE FROM THE PRINTER ALONG WITH IT.
Instructions for replacing and refilling PiezoFlow cartridges:
1. Test the syringe: look here for instructions, in Section I.
2. Before removing the old PiezoFlow unit from the printer, close the pinch valves on all four or six ink tubes.
3. Remove the PiezoFlow cartridges from the printer. Since PiezoFlow cartridges are held in place by friction from the foam pads, you may need to exert more force than usual to remove them. After removing both cartridges, remove the plastic arm by separating the Velcro that holds it to the printer body. Do not remove the Velcro itself from the plastic arm or the printer. Lift the entire PiezoFlow system out of the printer and set it on newspapers or paper towels to protect your tabletop from possible ink drips.
4. Replace the cartridge lids, install a set of flush cartridges, and return the print head to the parked position. Never leave your printer for more than a few minutes without cartridges installed, or the print head may dry out. Likewise, do not leave the print head in the “ink change” position for more than a few minutes as this can also dry out the print head.
6. Print the “flush image” here a few times on copier paper, until the majority of the old ink tone is gone from the image. After you are satisfied that the old ink has been sufficiently flushed from your printer, stop printing and leave the flush cartridges in the printer until you have your new ink system cartridges ready to install.
7. Prepare your PiezoFlow for use with the new cartridges- NOTE: if you are only replacing one cartridge, modify the steps listed below to only the cartridge you are switching. The other cartridge must remain connected to the tube(s), ink bottle(s). Close the pinch clamp on the cartridge ink supply tube(s) you are not refilling, while performing these steps.
To remove the ink tubes from the cartridges, first open the pinch clamps to the tubes for the cartridge you will be replacing. Hold the plastic tubing connector on the cartridge with one hand and gently pull the tube off with the other hand. As you remove each tube, lift it up to allow ink to drain out of the tube and into the bottle. Then proceed to the next tube you need to empty. When removing the tubes from the color position cartridge, you will also need to slide the tubes out from under the clip that holds them to this cartridge.
Discard the cartridges you have removed. If you are worried about spilling ink, place the old cartridges in plastic bags before throwing them out.
Note: unfortunately, you will not be able to recover the ink inside the cartridges that you are removing from the system.
8. Remove the ink bottles from the system: unscrew the caps from the ink bottles, and set the old bottles aside. You will be able to seal the old bottles for disposal using the caps you will remove from the new bottles.
9. Clean the ink tubes:
NOTE: if you are not changing the ink in one of the two cartridges, you will need to keep that cartridge and ink bottle(s) attached during the next few steps. This is cumbersome, but it is still easy to rinse out the empty tubes while carrying the attached ink bottle or bottles and cartridge to the sink. Make certain you do not run water on full ink bottles, or you will introduce water into the bottles through the air vent holes, diluting the ink.
Carefully carry the ink tubes to a sink and rinse the disconnected tubes and ink bottle caps with warm water. You will be able to remove all of the old ink, although the tubes stay slightly discolored from the old ink. Lift up the tubes to allow water to drain out: remove as much water as possible from the tubes after rinsing them. Leaving a few remaining droplets in the tubes is acceptable.
10. Prior to connecting the tubes to the new cartridge(s), use a pair of scissors to cut approximately 1/4” (~5mm) from the cartridge ends of the tubes. Cutting the ends of the tubes will remove any stretched portions, to ensure a tight fit of the tubes to the new cartridges.
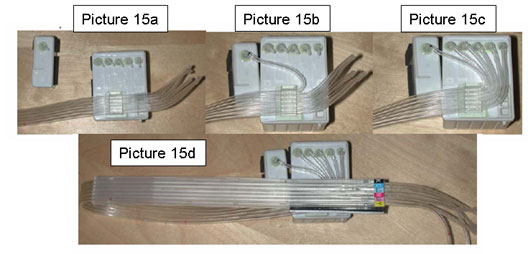
11. Connect the tubes to the new cartridges: Refer at the pictures below. Your cartridges may look different from the ones shown, but the steps are the same. A 6 color printer cartridge is shown in the pictures below.
Picture #15a: slide the tubes under the clip as shown. The uppermost tube is the black ink tube. Trace this tube back to the bottle to confirm you have oriented the tubes correctly.
Picture #15b: connect the black tube to the black cartridge as shown. Refer to the stickers on the lids.
Picture #15c: connect the color position tubes as shown. The order of the tubes, from left to right is as follows for 6 color printers (look on the plastic arm or the bottles for the labels): Black, Cyan, Light Cyan (or Photo Cyanine), Magenta, Light (or Photo) Magenta, Yellow. The order of the tubes, from left to right is as follows for 4 color printers: Black, Cyan, Magenta, Yellow.
Picture #15d shows tubes correctly connected to both cartridges. Notice that the tubes fold over the cartridges and the tube ends point toward the right. When the tubes are folded over correctly, as shown in this picture, the plastic arm is facing up (the Velcro side is pointing down).
12. Fill the cartridges: Refer to the tables in section II (here) for the ink filling order of PiezoFlow cartridges, and for instructions on filling your cartridge(s). As mentioned earlier, it is also very important to check your PiezoFlow unit and vacuum syringe for leaks (here). Please do not skip this important step.
13. Install the cartridges as described in section #I. Be sure to open the pinch valves on the ink supply tubes before you return the print head to the parked position with the new PiezoFlow cartridge(s) installed.
Section IV: successful long term printing with the PiezoFlow system
When set up properly, the PiezoFlow system will function just like standard, prefilled cartridges, but they will not run out of ink, as long as you continue to supply them with ink.
Below are tips to help keep your PiezoFlow unit and printer working well.
· Do not let the ink level fall below one half inch (about 10mm) from the bottom of the bottle. If the ink level gets too low, the ink tubes will start to pull air into the cartridges. You may refill your bottles by closing the ink supply tube pinch valves, unscrewing the bottles caps on the ink supply bottles, and then either refilling the old bottle from a new bottle, or replace the old bottle with a new bottle. After putting the cap back on the bottle, open the pinch valve. Make absolutely certain that you are putting the correct ink density (light, medium, dark or black), and tone (WN, CN, ST, CS), plus the correct black ink type, into the correct positions in the cartridge (via the ink supply tubes).
· Printer Ink level monitor: The printer operates as if it has prefilled (i.e., single use) cartridges in it. After printing many images, the ink level monitor will get low, and eventually will read “empty.” Reset the ink level monitor, using the applicable procedure, shown below:
o Printers using UNCHIPPED cartridges (860, 1160, 1200). On these printers, the ink level monitor automatically resets to “full” each time you replace a cartridge. Since you will not be replacing cartridges, you need to remove and reinsert the small foam pads in the front of each cartridge, which triggers a switch and resets the ink level monitor (the printer must be turned on when you do this). You may do this at any time.
o Printers using CHIPPED cartridges (1270, 1280, 1290, 2000P). The chips in prefilled (i.e., non-PiezoFlow) cartridges count the number of ink drops used during printing and print head cleaning. Normal cartridges will stop working when the chip indicates that the cartridge is empty. However, on the PiezoFlow cartridge chips, the ink level will get to a certain low level (approximately 10%), and then after you turn the printer off and back on, the chip will reset to read full. Since you must turn the printer off and on to reset the chip, if you print for a long time without turning off the printer, the chip may actually reach an “empty” state. This is fixed by turning the power off and back on.
· Print frequent nozzle check patterns: you can print these on typing paper, and they will show you any problems with your printer before you spend time, ink and paper to print an image.
· Run print head alignments: run a print head alignment each time you switch from paper of one thickness to another. Printing with an unaligned print head can cause banding and other unwanted image defects. You can print the alignment patterns on the back side of coated paper, allowing you to save paper. In addition to printing head alignments, you should also always keep your printer paper thickness lever set to “0” rather than to “1.” This applies even to 300+ weight paper. If you must move your lever to the “0” from the “1” position you will need to run a print head alignment. You may find at some point that your printer “loses” its alignment. This may happen over time, even if you always print on the same paper. If you begin to see banding and don’t see any missing nozzles in a nozzle check pattern, then run another alignment.
· Use your PiezoFlow unit regularly: the PiezoFlow unit works best when used frequently. If you don’t have any printing planned for a period of time, be sure to make small “maintenance” prints on copier paper or print a nozzle check pattern on a weekly basis, if possible. Regular use of your PiezoFlow unit will help to keep it working well. Allowing a printer to sit unused for periods of time can result in startup problems when you return to printing. If you plan to not use the printer for an extended period of time, you should remove the PiezoFlow system and install flush cartridges (procedure here)
· Turn off your printer when not using it. Use the power button on the printer, and not the switch on a power strip to turn off the printer. Turning off the printer properly parks the heads against the “capping station” keeping the print head from drying out.
· For best results, use your ink before the expiration date on the bottles.
· Do not mix different brands or versions of inks. When replacing a bottle of ink, you may combine inks of the same “vintage” and tone. Avoid mixing expired ink with fresh ink.
· Use ink before it expires. While PiezoTone and Neutral K6 inks have a long life once they’re printed onto archival paper, the ink in the bottles and cartridges has a shelf life, and should be used up before reaching that date. In a worst case scenario, expired ink can lose its density and/or color and if that happens, it will contaminate the cartridge holding it. Since the ink can never be completely flushed out of these cartridges, you must throw away the cartridge and replace it with a new one. For that reason, try to use up your ink before the expiration date. If you have a new bottle of ink that is approaching its expiration date, you are risking having it go bad before you can use it all. If a new bottle of ink is very old you may wish to consider discarding it, rather than risking damage to your cartridge.
Storing or moving a filled PiezoFlow system. If you plan to not use your PiezoFlow unit for a period of time, or if you are going to move your printer to a different location, you should remove the PiezoFlow unit and replace it with flush cartridges. Follow the steps below for removing, and then reinstalling your PiezoFlow unit:
a. Remove PiezoFlow for storage:
1. Close the pinch valves on all the ink tubes.
2. Remove the PiezoFlow system from the printer. Set it on newspapers to contain any ink drips.
3. Reinstall the cartridge lids and then put flush cartridges, or dye ink cartridges in the printer. Return the print head to the parked position, and print the “flush image” on typing paper two or three times to remove the PiezoTone ink from the print head. Then turn the printer off, using the power switch.
4. Place the ink bottles into a box, packing them so they stay upright. The bottle caps have small air vent holes in them, and if they are knocked over they will spill ink. Cover the air holes with tape to help minimize spilling.
5. Cover the ink outlet holes on the bottoms of the cartridges with tape, to keep them from drying out.
6. Place the entire PiezoFlow unit, including the ink bottles into a large plastic bag and seal it. Place the bag in a box that will remain upright until you are ready to reinstall the unit in the future. You have now done all you can to protect your printer, by removing the pigment ink from your print head and replacing it with clear flush fluid, and your PiezoFlow unit, by sealing it in a bag and protecting it from drying out.
b. Reinstall stored PiezoFlow unit:
o Turn on the printer, and run a few print head cleaning cycles. If you have dye ink cartridges, or dyed flush cartridges in your printer, print a nozzle check pattern to verify that you have a complete nozzle check pattern. If you do not, run print head cleaning cycles to clear the blocked nozzles.
o Examine the PiezoFlow unit. Make sure that it’s still intact after being in storage- mainly check to see that the ink hasn’t spilled from the bottles. If the ink tubes are full of air, refill them using the instructions in the next section before reinstalling the unit.
o Remove the flush or dye ink cartridges from the printer (unplug the printer first if you have chipped cartridges). Remove the cartridge lids. Cover the ink outlet holes of the flush cartridges with tape and store them in closed plastic bags. Save the cartridge lids for future use.
o Remove the tape from the bottom holes in the cartridge, and from the air vents on the bottle caps, and reinstall the PiezoFlow system in the printer. If you no longer have the Velcro strip attached to the printer, you can buy a replacement piece at a hardware store. Buy one that’s at least as long and wide as the strip attached to the plastic arm.
o Proceed as you did when installing the PiezoFlow unit for the first time.
This section discusses a few potential problems you may encounter, and their solutions.
Issue 1: Print head running over the tubes:
The print head can run over the ink supply tubes if there is too much slack in them. If this happens, check and adjust the following two items.
· Plastic arm position: Make sure that the left side of the plastic arm is higher than the right side. If the arm dips down, it will lower the tubes so much that they will get in the way of the print head.
· Tube slack: When the print head is at the far left side of the print carriage, the low point of the tubes can hang down no more than approximately 1/4”. If the tubes are too loose, and they hang down too far, the print head will run over them. To remove the slack, simply move the plastic arm slightly to the right, by repositioning it on the Velcro tab. If you can’t move the tubes far enough on the Velcro pad, you can slide the bundle of tubes to the right, inside the plastic arm. Make certain that you do not have less than ¼” of slack, or the print head will pull on the tubes when the print head is at the far left side of the printer carriage.
If the print head continues to run over the tubes, examine the tube clip on the color position cartridge. Make sure that this clip has not come loose from the cartridge. If it has, this will create slack in the tube. You may fix this by regluing the clip to the cartridge. If the clip has broken, you will find a replacement clip in the small plastic bag that of spare parts and foam pieces, that came with the PiezoFlow system.
Issue 2: Air entering the tubes:
A small amount of air can remain in the cartridge during the filling and installation of the PiezoFlow system, and then appear in the tubes, usually near the cartridge. Usually a small amount of air is not a problem. Additionally, air may appear in the tubes over time.
You may leave a small amount of air in the tubes without affecting either the printing, or the ability of the cartridges to refill with ink from the bottles. If you want to, you may remove this small amount of air by running several print head cleaning cycles. (However, even if this works, realize that the air is now inside the cartridge, and may reappear in the tube in the future). If you see more than two inches of air (about 5cm) in the tubes, you may try removing it using the procedures below.
If a tube is completely empty, or if the end of the tube that connects to the ink bottle is empty, this is a separate problem you must address before refilling the tube:
· Make sure that the ink bottle is not empty. Refill it if it is.
· Even if the bottle has ink in it, make sure that the end of the tube is below the surface of the ink. Sometimes the end of the tube can be curled, and be above the ink surface. If this has happened, open the bottle cap, and straighten the tube so the end goes into the ink.
Causes of air in the tubes:
Air can enter the tubes for different reasons. Some of these you can fix; others you cannot.
· The cartridge may never have completely filled, and the small amount of air at the top of the cartridge moves into the tube over time. Usually, print head cleaning cycles will remove the air from the tubes.
· If the cartridge is not fully seated in its holder, air can leak into the ink outlet holes of the cartridge, through the cartridge and into the tubes.
· There may be a loose fitting tube on the plastic tube connectors of the cartridges, allowing air to leak in. This may happen especially if you have replaced the cartridge in the past. This is fixed by trimming the loose end of the tube (see below).
· Air can enter the tubes if the PiezoFlow system is not used for extended periods. When the printer is running, the ink that comes out through the print head causes a slight vacuum, which pulls fresh ink from the bottles and into the cartridges. But if the printer sits for weeks without use, air can leak in because the printer and cartridges are never 100% completely tight. The best ways to avoid this are by using the printer regularly, and by closing the hose clamps when the printer is not in use for periods of a week or longer. However, if you close the pinch valves, it is very important that you reopen them before you turn the printer on.
Fix the problem first, if you can identify a cause of the leak:
Make sure that the cartridges to ensure that they are fully seated in their holders: remove each cartridge and look into the cartridge holder to see if a piece of debris, such as a piece of the foil seal from the bottom of the cartridge is causing a gap between the holder and the cartridge. Also, look at the underside of each cartridge to see if the foil seals have a fold in them, preventing the cartridge from being fully inserted. Generally this is not a problem on printers using chipped cartridges (1270, 1280, 1290 and 2000P), because the cartridges must already be well seated in order for the printer to make contact with the chips. But if you see that the red light on the printer comes on, indicating that a cartridge is either empty or missing (you can verify the exact cause by looking at the ink status monitor), the cartridge may have shifted up. This sometimes happens because we are not using the cartridge lids to hold the cartridges down, and they can mover over time.
If the tube is fitting loosely to the cartridge, trim the end of the tube before refilling it (see below).
Refilling the tubes with ink:
This section begins by telling you what not to do: The worst way to try to fix this problem is to try pulling the “air” out of the cartridge as you did when you first installed your PiezoFlow system. Trying this technique creates problems because, instead of putting ink in the tubes, you will pull air through print head nozzles, through the bottom of the cartridge, and into the tube, actually putting more air in the tube and the cartridge, and potentially drying out the print head. Rather that creating new problems, follow the procedure below:
a. Close all the pinch valves on the tubes, and remove the Piezoflow from the printer. Set it on a layer of newspapers, to absorb any ink spills. Install a second set of ink or flush cartridges (plus the cartridge lids) into the printer, if you will be taking more than five or ten minutes to complete the next steps.
b. Pull one of the empty tubes off of the cartridge. Open the pinch valve on this tube, and hold the tube up, to allow ink to drain back into the ink bottle. Try to remove as much ink as possible. It is recommended that you rinse the remaining ink out of this tube by taking the end out of the bottle, carrying the PiezoFlow to a sink, running water through the tube and then blowing as much air out of the tube as possible. Trim ¼” (around 5mm) from the cartridge-ends of the tubes you have pulled off, as a precaution of reattaching a stretched tube back onto the cartridge, and causing new leaking problems.
c. Put the cap back on the bottles, making sure that the tube goes straight down into the ink.
d. With the tube back in the ink supply bottle, connect the T-valve of the vacuum to the cartridge end of the tube, and SLOWLY pull the plunger, to suck ink into the tube from the bottle. Stop pulling when there is around ¼”-1/2” (5-10mm) of air in the tube next to the syringe. (If you pull liquid into the T-valve on the syringe you can potentially damage it.)
e. Close the pinch valve on this tube, and then pull the vacuum pump off the tube. Connect the filled tube to the tube connector on the cartridge.
f. Repeat this procedure for the other tubes.
g. When all of the ink tubes are full of ink, put the cartridges back into the printer and open the tube clamps.
h. Run several print head cleaning cycles to move the remaining small amount of air out of the tubes.
Issue 3: Ink dripping on prints or otherwise not printing properly:
· Height of ink bottles: The ink bottles must remain on the same surface as the printer; not raised or lowered relative to it. The PiezoFlow unit is designed to work when the ink level is about 3.5” above the table (full bottle) to just about at table level (nearly empty bottle), but anything above or below this range will cause problems. In certain cases the ink can drip out of the print head onto the prints, and in other cases the ink might not flow out of the print head properly. In a worst case scenario, if the bottles are raised too high, the ink can siphon out of them, and into the printer.
· Foil seals on bottles: You must remove most or all of the foil seals from the bottles. Some people poke a small hole in the bottle just large enough to squeeze the tube into, and this can hinder ink flow out of the bottle. If you have done this, open the bottle and tear away more of the seal.
· Air vents in bottles: The old style ink bottles have a vent tube in the top of the cap, and the new bottles have small air holes in them. Sometimes the air vents can become clogged with ink, which could prevent ink from coming out of a particular print head channel. If you have the old style of bottle, you can simply pull the vent out of the bottle, leaving the exposed hole. If you have the newer style bottles, poke a pin into the holes to open up any clogs.
Issue 4: Tube clip coming loose from color cartridge:
On occasion, the tube clip may come loose from the color position cartridge. The symptoms of this may be seen before the loose clip is noticed, because a loose clip can cause the tubing to become too loose and get run over by the print head. If your clip has loosened, reattach it by gluing it to the cartridge. The best types of glue to use are epoxy or “Plumber’s Goop.” Do not try to use the thin “superglue,” as it will not hold the clip securely. Also don’t tape the clip back down because it will only work temporarily, at best.
If the clip breaks off the cartridge, you will find a replacement in the bag containing the foam pads that came with your original PiezoFlow kit. Attach it in the same place as the old clip, using glue, epoxy, or “Plumber’s Goop.”
Issue 5: Obtaining spare parts: The following is a list of parts that are available and parts that are not available for replacement.
· PiezoFlow cartridges- available for all supported printers, in both the black and color positions.
· Syringe/valve- available as a unit
· Bottle holders are available.
· Flush cartridges are available.
· Replacement tubing is NOT available as a separate item. This is only available with the purchase of a PiezoFlow unit.
· Plastic arm is NOT available as a separate item. This is only available with the purchase of a PiezoFlow unit.